Sol Print Studio: plate test
This article first appeared in the Spring 2013 issue of the Newsletter for the Print, Drawing & Photograph Society of the Baltimore Museum of Art. (All photos are by Scott Ponemone)
Not often can you enjoy a printmaking exhibition and then invite yourself into the studio to see how it’s done. Thanks to writing for the Newsletter, this is what has happened. Last fall I was so impressed by First Impressions Sol Print Studio, an exhibition at Stevenson University, that I met with the artists and interviewed them for my blog “Art I See.” ( That blog post can be read at: http://www.scottponemone.com/sol-print-studios-exhibition-at-stevenson-university/ ) This winter Soledad Salamé, the founder of Sol Print Studio, invited me to her Reservoir Hill home and studio to watch her and fellow artist Randi Reiss-McCormick proof two of Randi’s plates.
What makes Sol Print Studio interesting as a printmaking venue is the “Sol” part. For her intaglio prints Soledad exclusively uses Solarplates. These thin metal plates have a surface of a polymer material that is light sensitive and water soluble. When the plate is exposed to UV light (either directly from the sun or under a UV lamp), the polymer is no longer water soluble. But if an opaque area—usually from an image on a clear film—prevents light from reaching parts of the plate, then the polymer on these parts will wash out with water. Hence this etching process is nontoxic. Gone is the use of acids, asphaltum and petroleum solvents.

But is the non-toxicity the only difference in the use of a Solarplate compared to that of a regular zinc or copper intaglio plate? This is what I wanted to find out. This is why I was delighted when Soledad invited me to watch Randi and her work at Sol Print Studio.
>>>>
Soledad lifted the top of one her two light boxes used to expose Solarplates.
When Soledad greeted me at her gracious, art-filled townhouse, she lead me not up to her third-floor studio but into her kitchen. “Frittata?” she asked. She cut me a delicious thick wedge of eggs, green beans, onions and black olives from a cast iron frying pan. And of course a cup of strong, black coffee. Randi arrived and joined us in the kitchen.
What a pleasant way to start a day—good food and talk of art-making. Upstairs an open-floor plan made her studio expansive and light-filled. Two light boxes for exposing Solarplates were near the top of the stairs. Toward the middle of the room was her etching press. Near the west window stood an open rack with supplies of inks and other printing materials.
Worktables were nearly everywhere. The walls showed off many finished products of Sol Print Studio.
Partially for my benefit the day’s exercise was to proof two small plates of an abstract composition by Randi. Each was exposed to the same image. But Soledad explained that each also was exposed to different transparencies called aquatint screens. This is when I realized how different the use of Solarplates could be compared to normal metal etching plates.
Solarplates are oftentimes exposed (or “burned”) to light twice—first with an aquatint screen and then with the transparency holding the image. Soledad quotes from the writings of Dan Welden, who originated Solarplates: “Using a double exposure with an aquatint screen allows you to retain extensive areas of deep rich black in an intaglio image. The technique eliminates the problem of the polymer washing away, creating an open area which will not pickup ink. This is what printmakers call an ‘open bite’ in the traditional etching process.”
![]()
Soledad held a transparency used to create Randi’s Solarplates.
Randi, via an exchange of emails, said, “We were comparing two different types [of transparencies]. We usually use a clear transparency made by 3M that works very well, but we wanted to compare it to a very nice transparency called Pictorico that is recommended for other graphic arts processes. It is a milky white color so we were not sure how that would affect the exposure time if at all.”
So as they say: “A light bulb went off.” Solarplates can be exposed two times to UV light, but “etched” once. In other words, once you wash a plate with water, the Solarplate is finished (unless you want to physically cut away parts of the remaining polymer). In most cases there are no first and second states. Zinc or copper etching plates, on the other hand, can be re-exposed to an acid bath several times, creating a new state with each exposure.
Soledad phrases it this way: “Traditional intaglio works with acids and various techniques to etch different marks into the metal. The process is endless and can take many layers. In solar etching the process of etching essentially is reduced to one process. All the range in marks is worked out through drawing and digital work on the transparency that is then etched by the sun to expose the photo emulsion.”
So the logistics of (and the mindset for) creating an image on a Solarplate differs greatly from regular etching plates. Randi said, “Solarplates are interesting to me for the relative ease of creating an etching plate but also for the challenge of creating a new type of drawing for the transparencies that are critical for the development of the plate. I like combining traditional drawing techniques with the new technologies available through imaging programs such as Photoshop. This has opened up a new world of possibilities where printmaking can take you. Digital work is just another avenue to find new ways of mark-making.”


Randi (top) used a simple squeegie to first put ink on her two test plates.
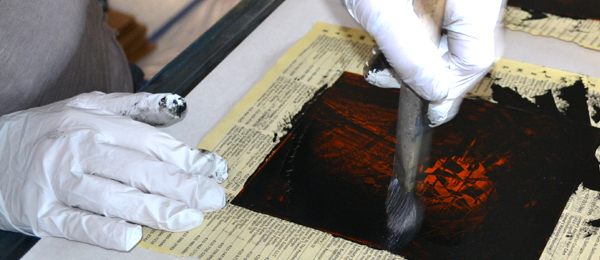
As a finishing touch, Soledad (left) used a Q-tip to
remove traces of ink from one of Randi’s test plates to create highlights.
Soledad and Randi then went to work on a glass-top table to ink up the test plates. They used the same type of etching ink normally employed on metal plates. In fact, once Solarplates are processed, they’re printed just like metal plates. (Of course these inks require solvents for cleanup, but in the spirit of non-toxicity Soledad stocks a soy-based solvent.)
They placed the prepared plates side by side on the bed of the etching press, each plate getting its own sheet of dampened printmaking paper on top. Randi cranked the press to move the bed carrying the plates under the broad roller. Then it came time to lift the felt blankets and see what happened.

As you can see, they examined the proofs side by side. In the photograph the one in the reader’s right (below Soledad) is a proof of the Solarplate that was first burned with the aquatint screen with the milky-white color. The other proof came from the plate exposed to the 3M screen that Randi had used previously. The consensus was that the 3M screen produced a more nuanced tonal range on the proof on the left, that the proof on the right was harsher.
So something valuable was learned that day. Printmaking, whether with Solarplates or not, is like that. Successful printmaking is a learning process. Unexpected discoveries, good or bad, can be made at any time. And each one can add to a printmaker’s lexicon of options. I want to thank Soledad Salamé and Randi Reiss-McCormack for allowing PDPS members to witness this one day of learning.
For more background on Sol Print Studios
• check out http://solprintstudios.blogspot.com/
for a video on the Stevenson exhibition as well as
Soledad’s recent exhibition at Miami Art Basel.
• And for a look at Randi’s painting and prints:
http://www.randireissmccormack.com/
• To learn more about Dan Welden, the originator
of Solarplates, check out:
http://www.danwelden.com/Home2.html
Trackback URL: https://www.scottponemone.com/sol-print-studio-plate-test/trackback/
Leave a Reply
-
Accessions: Short Stories Dec 21, 2025

-
The Mike and Scott Show: No Reruns Nov 25, 2025

-
Griffin Chairs: Both naive and refined Oct 04, 2025

-
Circularity: The Pairing of Two Talents Jul 12, 2025

-
Frans Masereel: Workers’ Paradise in 1939 Europe Apr 11, 2025

-
Erich Glas: Through the Night vs. Leilot/Nights Jan 15, 2025

-
Gustav Wolf: His Monster Menagerie Dec 23, 2024

-
Linos: #5 through 15 Nov 01, 2024

-
Gustav Wolf: Confessio Aug 02, 2024

-
Justin Remo’s Big Finale May 21, 2024

-
Accessions: Short Stories Dec 21, 2025
-
The Mike and Scott Show: No Reruns Nov 25, 2025
-
Griffin Chairs: Both naive and refined Oct 04, 2025
-
Circularity: The Pairing of Two Talents Jul 12, 2025
-
Frans Masereel: Workers’ Paradise in 1939 Europe Apr 11, 2025
-
Erich Glas: Through the Night vs. Leilot/Nights Jan 15, 2025
-
Gustav Wolf: His Monster Menagerie Dec 23, 2024
-
Linos: #5 through 15 Nov 01, 2024
-
Gustav Wolf: Confessio Aug 02, 2024
-
Justin Remo’s Big Finale May 21, 2024