
FLOORCLOTH: Painted canvas for 1806 hallway
Well, they say that you never forget how to ride a bicycle. I got a chance last December to see if I had forgotten how to do a floorcloth: a canvas painted to simulated marble laid out in a geometric pattern. It had been at least a dozen years since my previous effort, and that one was for the middle parlor of my Mount Vernon townhouse. My last previous commercial floorcloth was installed at the Baltimore Museum of Art a good 15 years ago. (The wing of the museum in which it was located is now undergoing renovation. I wonder if my piece will be reinstalled when the work is done.)
For background information on floorcloths please go to: http://www.scottponemone.com/floorcloths
Production
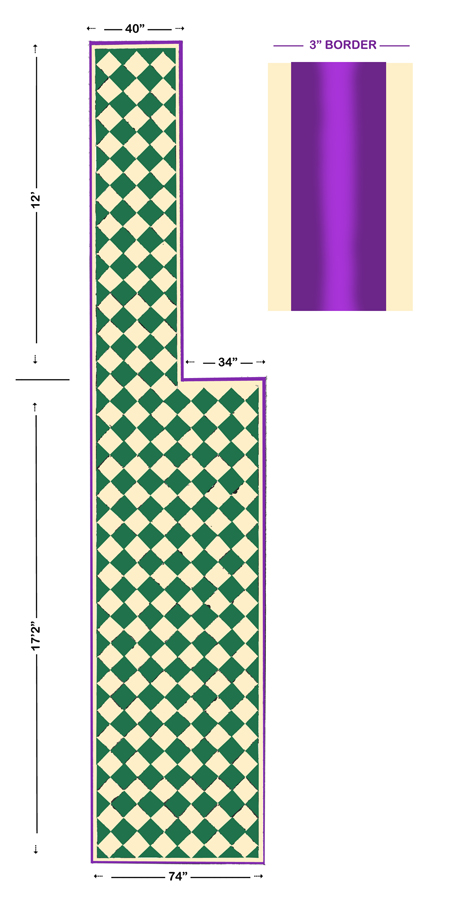
The process began when a couple with a 1806 federal house on the Maryland Eastern Shore invited me over last summer to discuss the possibility of creating a floorcloth for their entry hallway. As you can see their hall has two widths. When you enter the house the hall is 6.5 feet wide, but, where the stairway is, the width decreases to under 4 feet. The couple had two principal requirements: 1) the pattern had to be continuous despite the change of widths and 2) the colors had to match the hall wallpaper. So I set about to measure the hall. The clients wanted it to nearly fill the hall, leaving approximately 1.5 inches of floor visible around the perimeter. I drew a rough sketch of it. Their seemingly compact hall measured over 29 feet long. The first thing I told them was that I would have to make it in two pieces. Then I calculated the square footage in order to arrive at a price (which went into a sequence of negotiations, which I won’t be detailing here).
Fortunately the clients wanted a simple diamond pattern with a narrow border. All I had to do was figure out the appropriate scale of the diamonds and the math to make it work out. It turns out that, if I use diamonds 8 inches on a side, a continuous pattern of diamonds could be accomplished if I narrowed the piece beside the stairs by only one inch. This is what I came up with. (The colors particularly of the border are approximate at best.) There would be yellowy cream diamonds and dark green diamonds, while the border would have stripes of the same yellowy cream on both sides and a wider center stripe of (as it turned out) two-toned magenta. Except for one small area where the stairs reach the hall floor, the half diamonds (and the quarter diamonds at the corners) that touch the border would be dark green.
This design was agreed to, and a contract was signed in September. The client realized that I won’t begin until December and that the work wouldn’t be ready for installation until mid-January. The delay on the start was due to an October residency I was awarded by The Studios of Key West and wedding plans (thank you Maryland voters and then the Supreme Court) in November. The actual painting would take a month. Then the three clear acrylic top coats would need two weeks to cure.
Essentially the following is a photo gallery of the process. Here are the steps I would take:
1) Clear the dining room for the wider floorcloth piece and my studio (on the floor above) for the narrower piece.
2) Roll out the 84-inch-wide #8 cotton duck (canvas) in the dining room, measure it, cut it and staple it to the floor. Measure out the studio piece, cut the width to 6 feet and staple it down.
3) Using foam pads on an extension pole, put two coats of gesso on both pieces of canvas. Sand after each coat.
4) Again using foam pads, put three coats of the base color (yellowy cream).
5) Drawing out the pattern should have come next. But I froze. Were my measurements last summer accurate? I wasn’t positive. So I made a second trip to the Eastern Shore only to find out they were. Only then did I pencil in the pattern. (I had fears as well that I wouldn’t keep everything square–fears that wouldn’t be soothed until installation day.)
6) Marbleize the lighter diamonds in two steps: first using a very light cream paint, then veining with magenta to reference the border color.
7) Tape around what were to become the dark green diamonds.
8) Two coats of dark green paint on those areas, then two passes over those diamonds to marbleize them.
9) Remove tape surrounding the green diamonds and then clean up areas where paint leaked under the tape (fortunately very few places)
10) Tape around the wide stripe of the border.
11) Three coats of the magenta paint and two coats of dark grape paint that was feathered toward the center of the stripe.
12) Remove that tape and clean up edges.
13) Apply three coats of clean acrylic over everything (and try to remove any debris–mostly pet hairs–after each coat).
14) After a week, cut out the floorcloth and let cure another week.
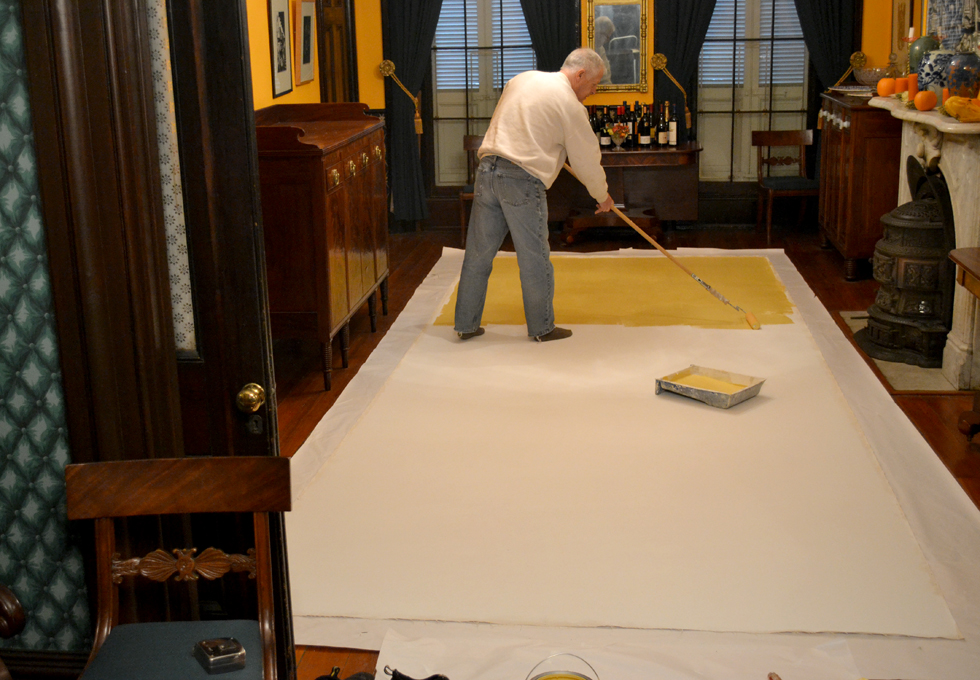
In the dining room, I’m spreading the first coat of the base color onto the canvas upon which two coats of gesso had been applied.
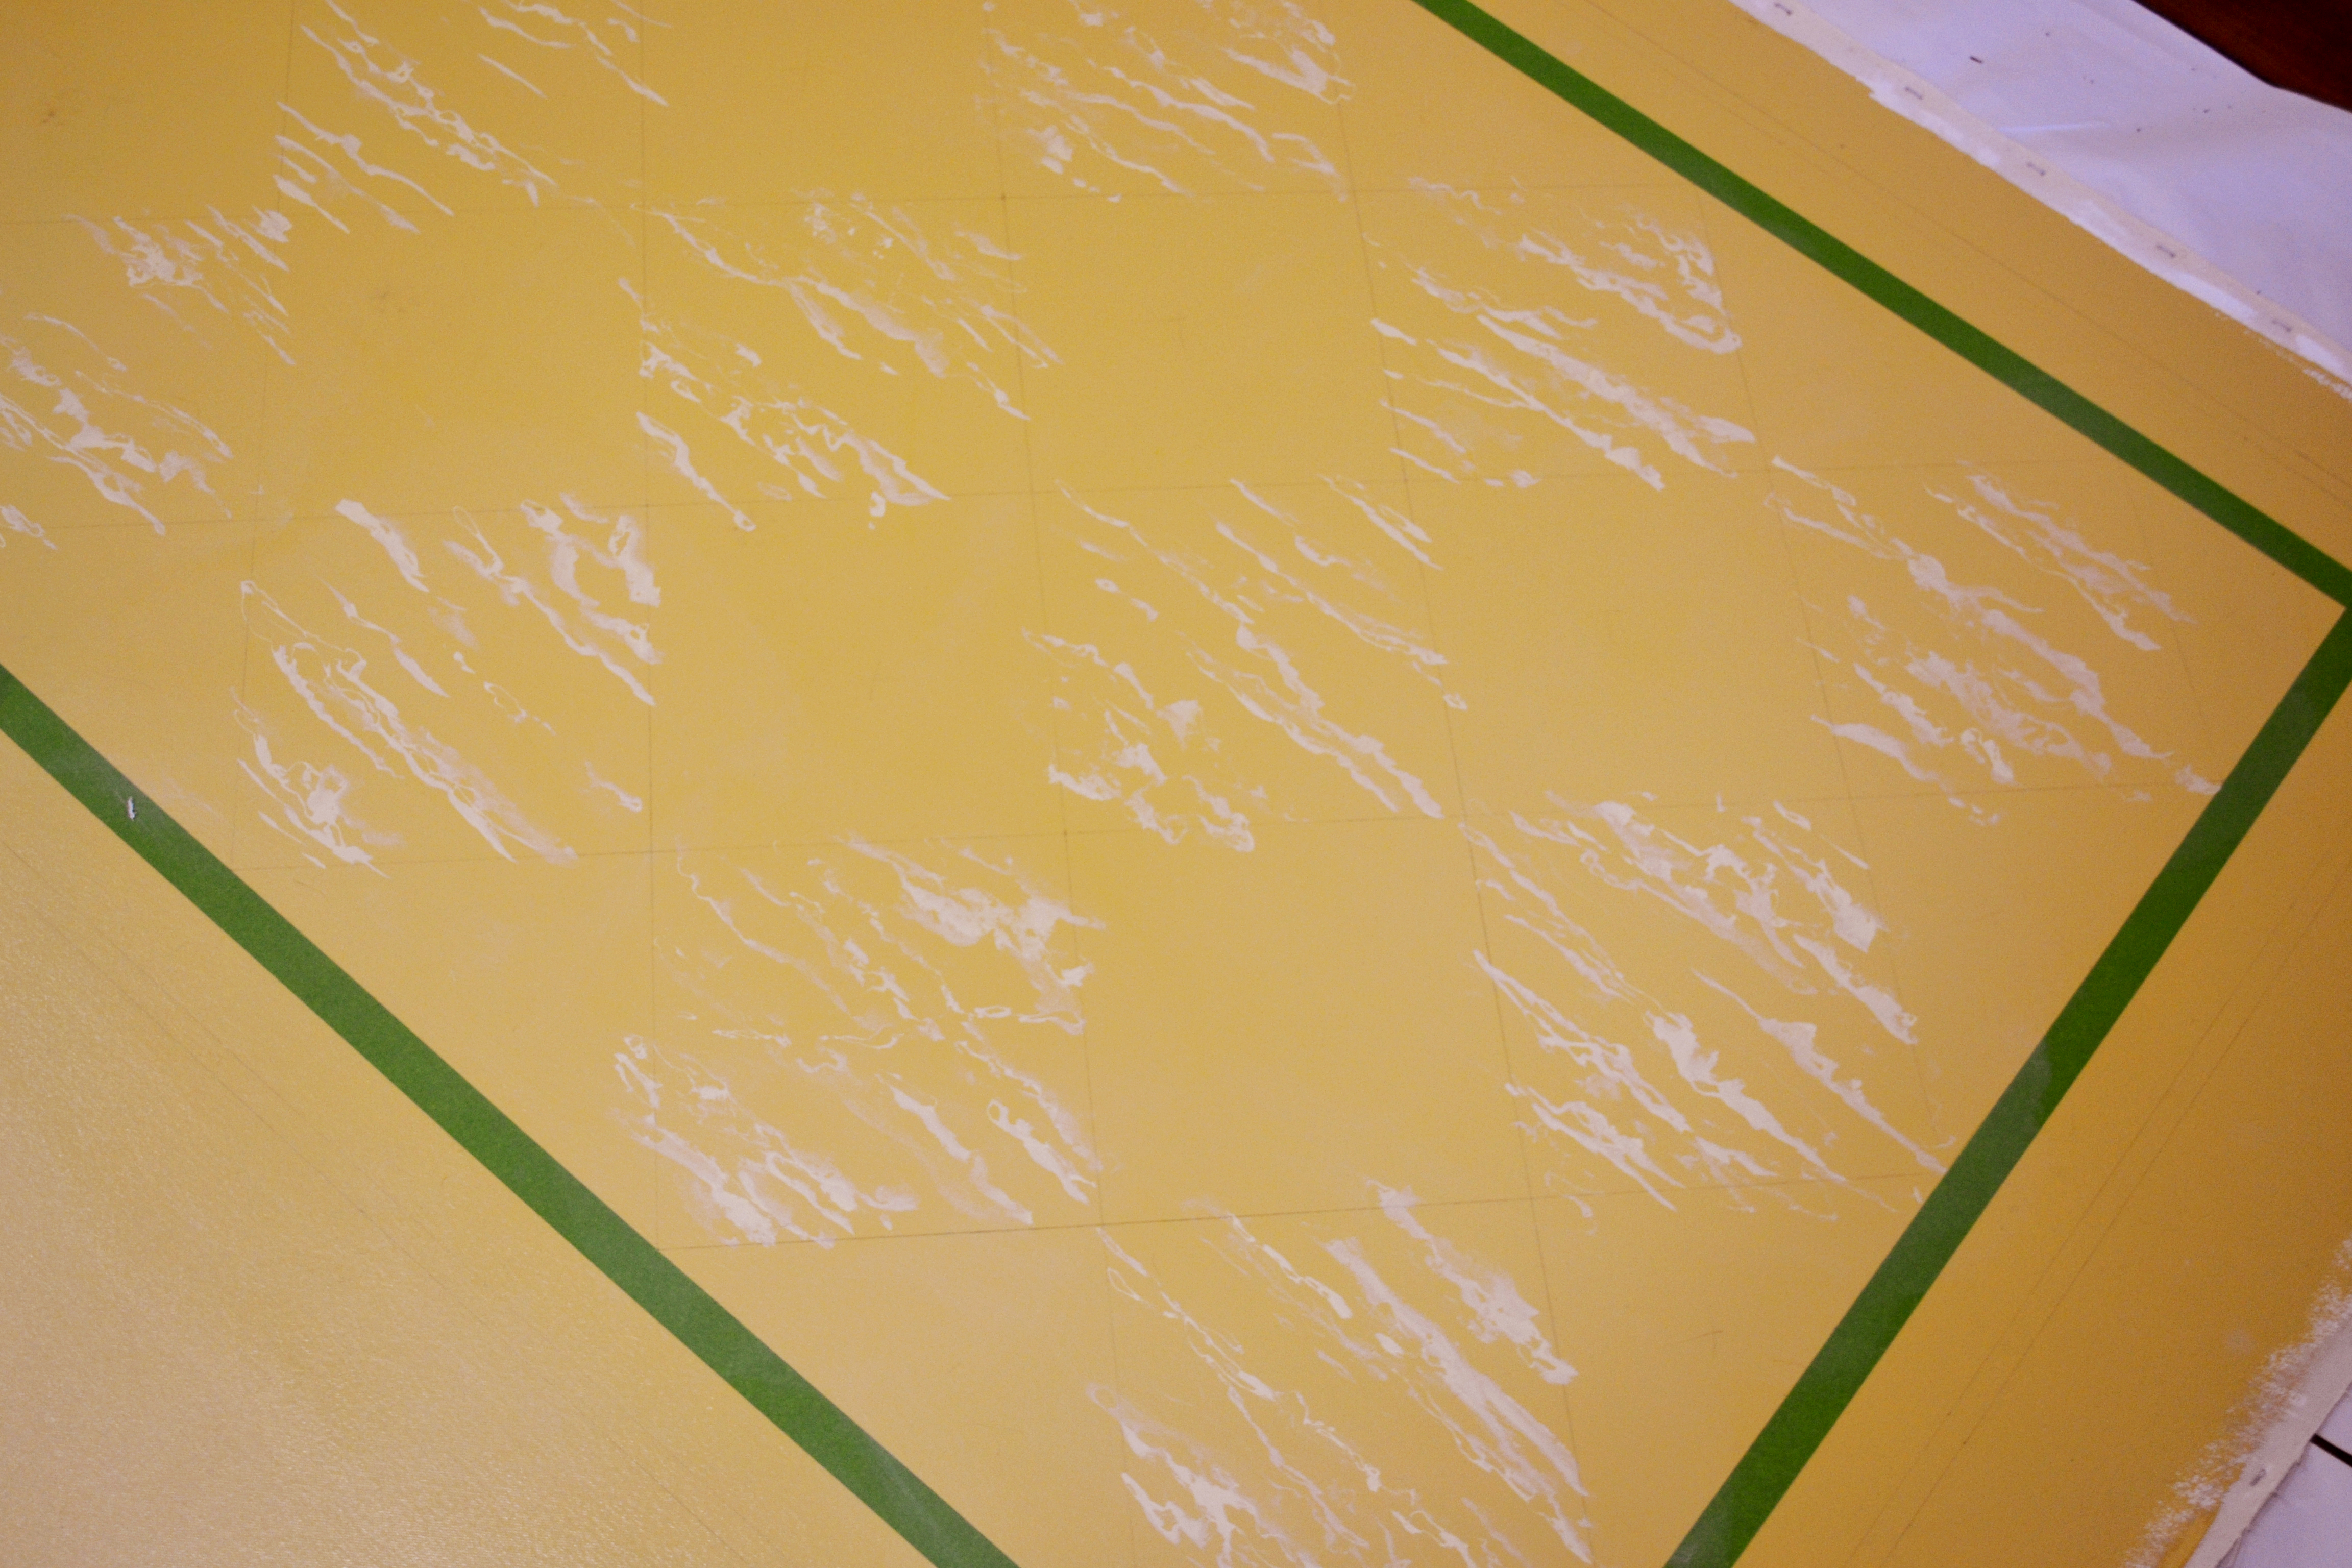
A closeup showing the penciled grid of diamonds and the first pass of marblelizing of the lighter diamonds.

I’m applying the first coat of dark green paint to diamonds delineated by tape. Note that the lighter diamonds have a few streaks of reddish paint.
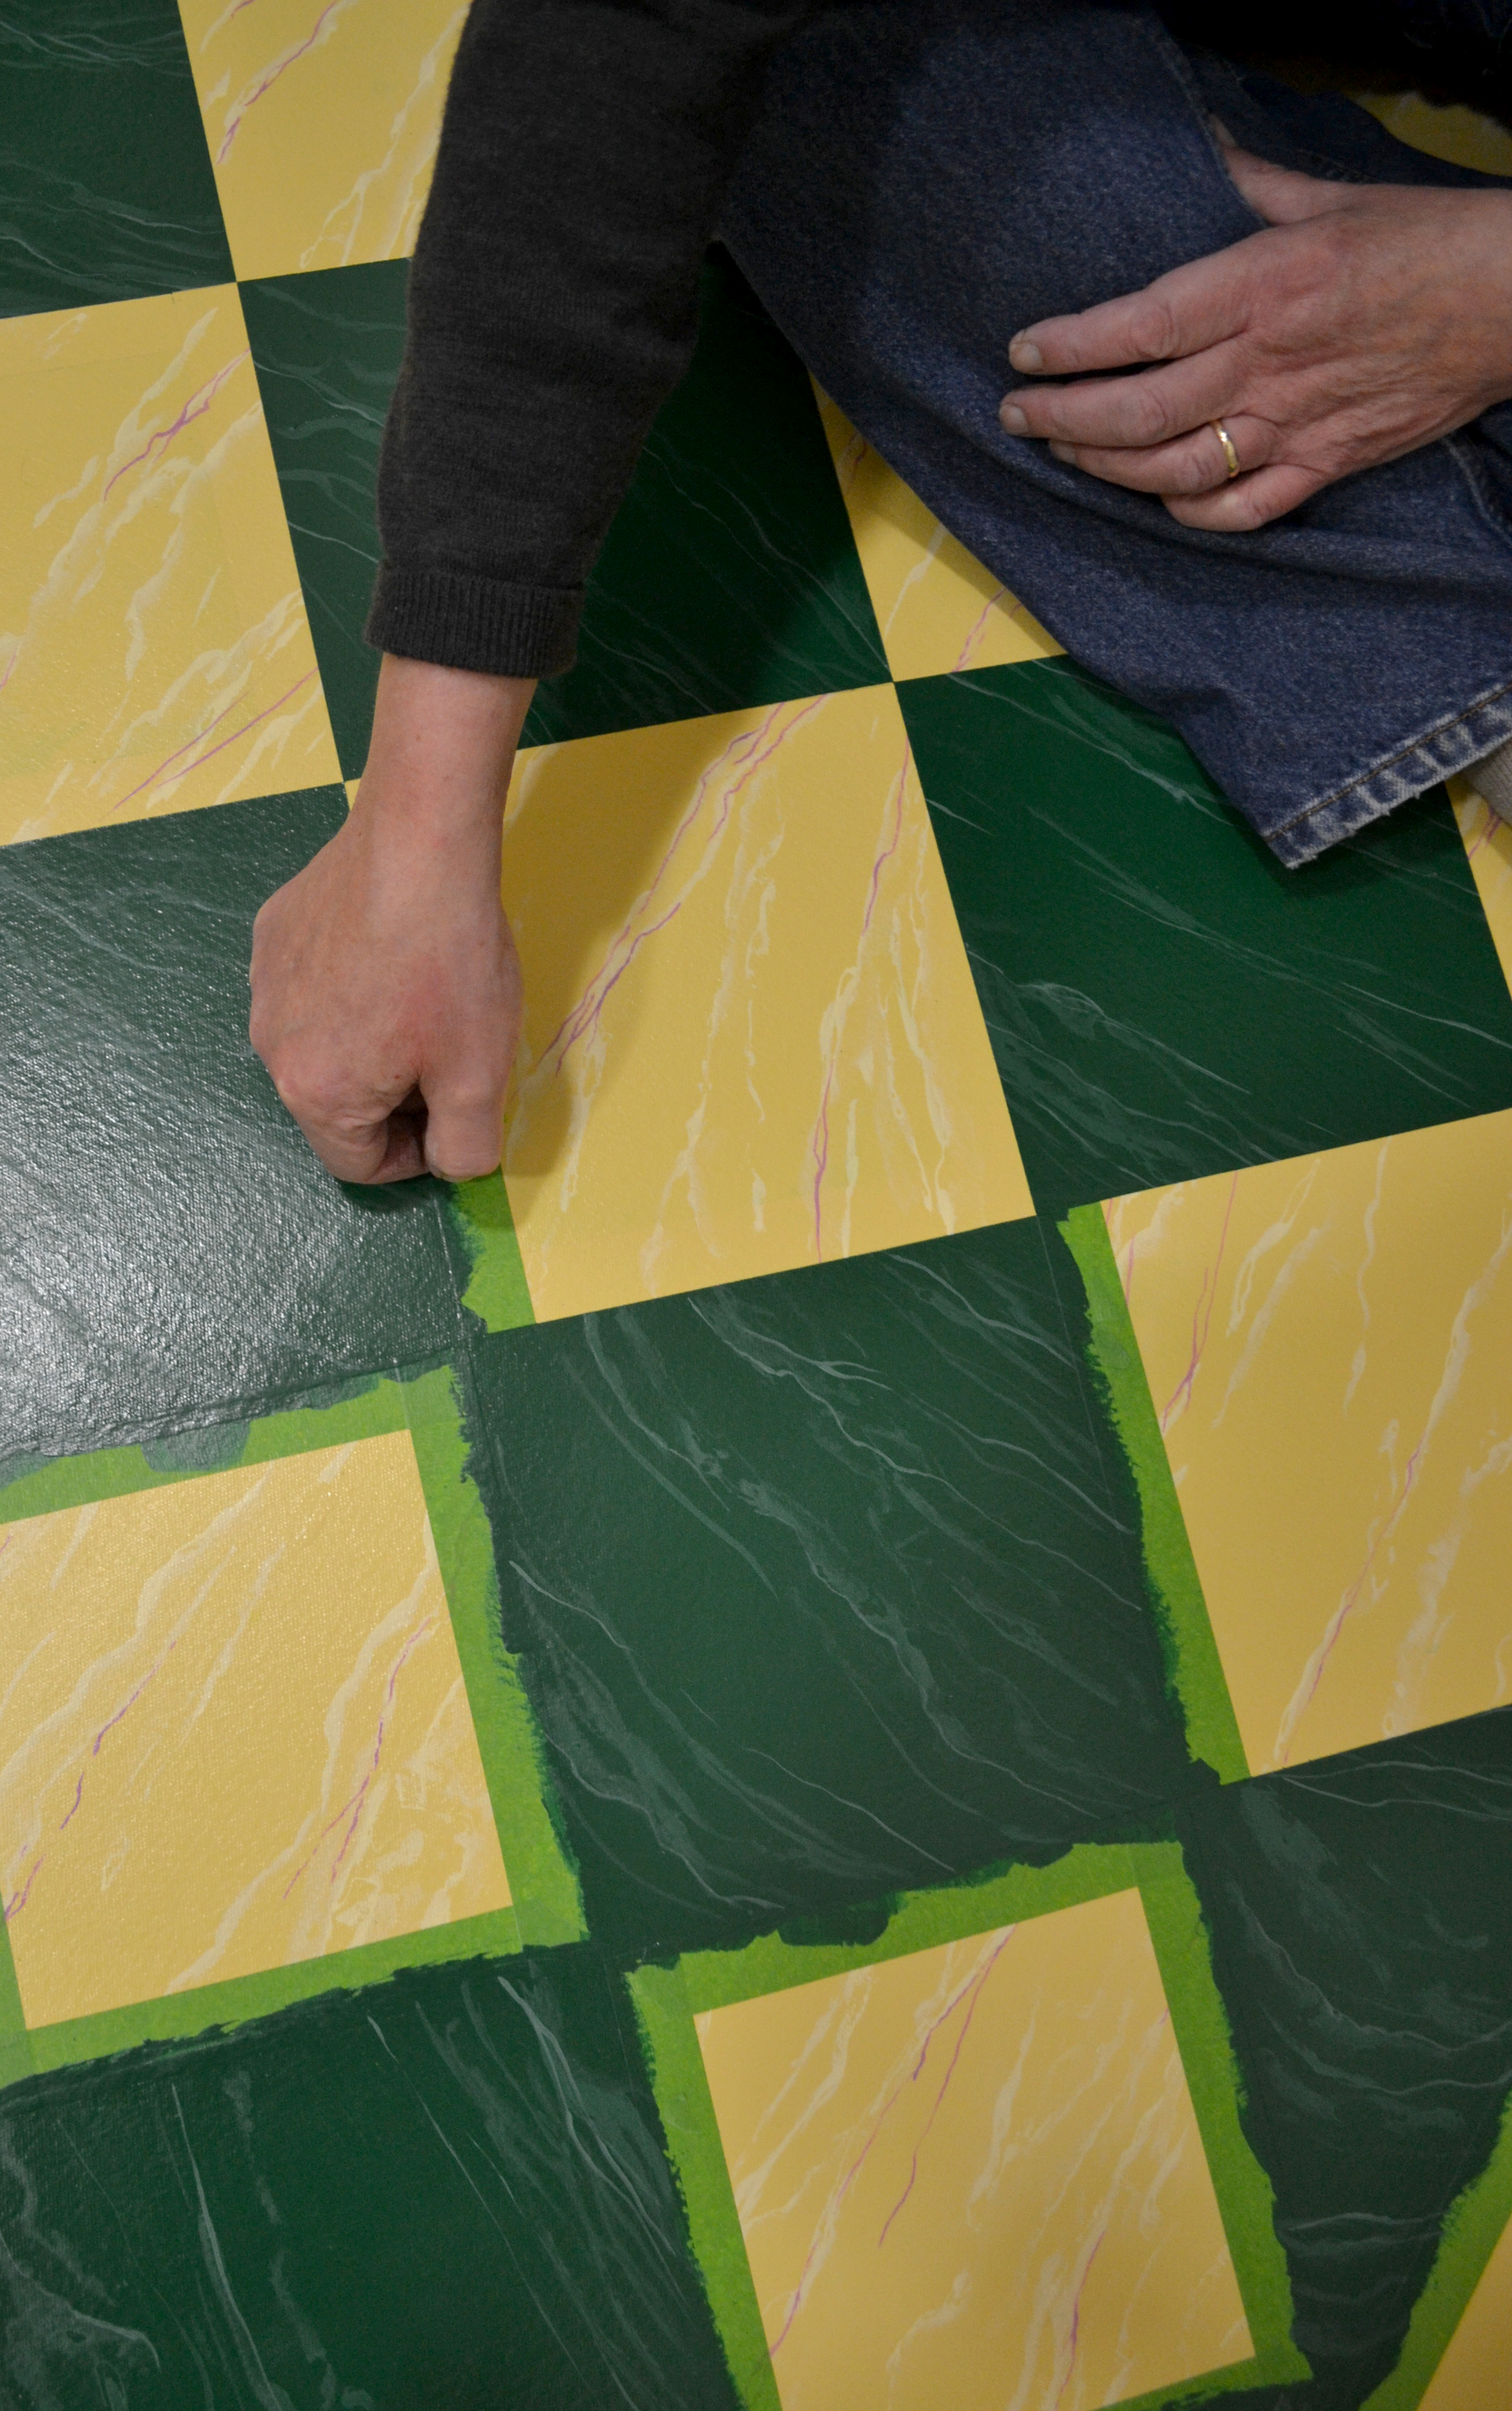
Michael (my life’s partner and now my husband) is pulling tape that surrounded the green diamonds which have been marbelized. Note that the marbelizing of the green diamonds generally runs perpendicular to that in the cream diamonds.

[Clockwise from top left] Closeup of the finished diamonds. The narrow section of the floorcloth (upstairs in the studio) with the diamonds done. The first coat of magenta being applied to the border.
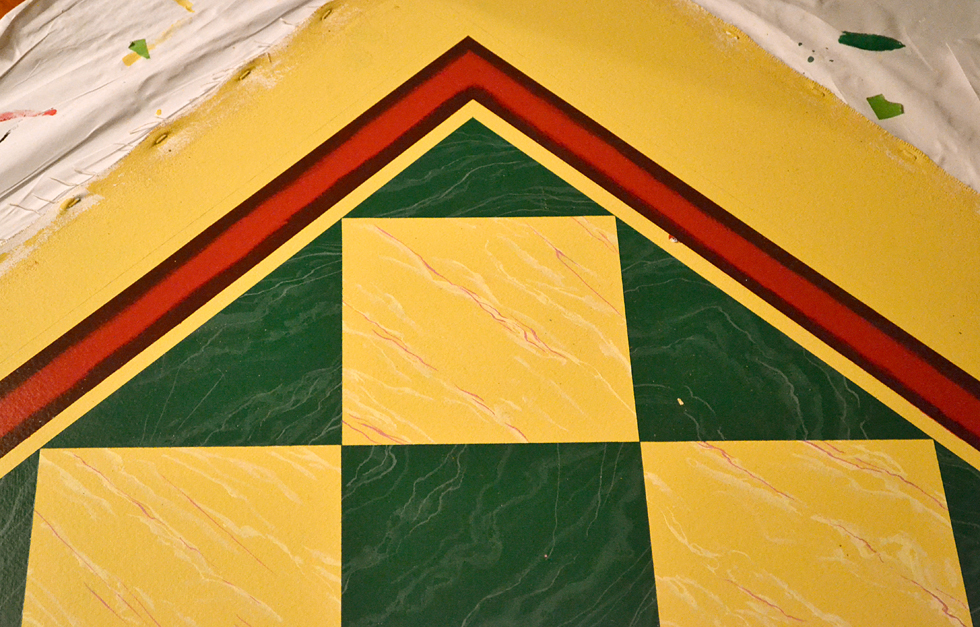
Completed border with the outside edges toned with a dark purple paint.
The dining room section of the floorcloth after three coats of clear acrylic have been applied and the canvas has been cut down to the finished size. Count the diamonds to see how demanding even a simple pattern can be.
This is the part of the wider section of floorcloth that will wrap around the base of the stairs and meet the narrower section that was produced in the studio.
Installation
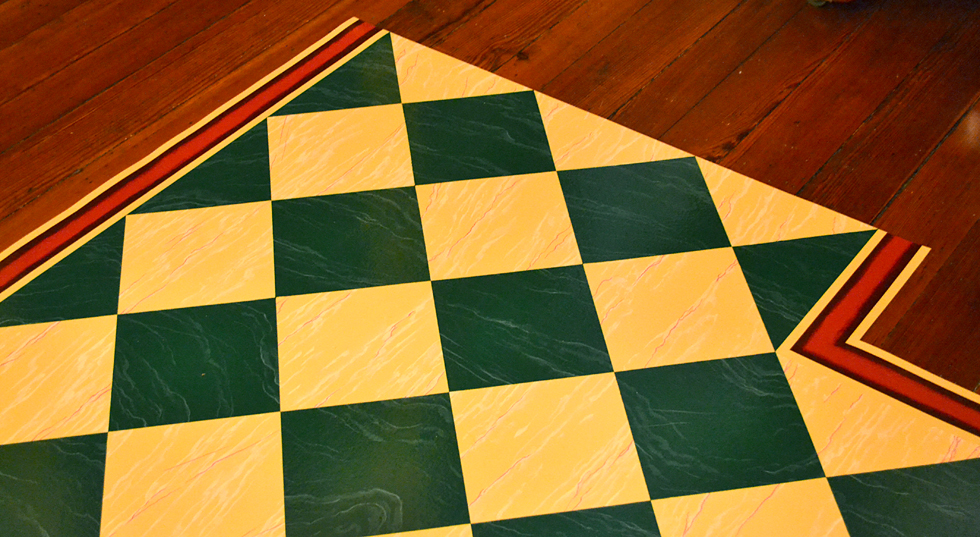
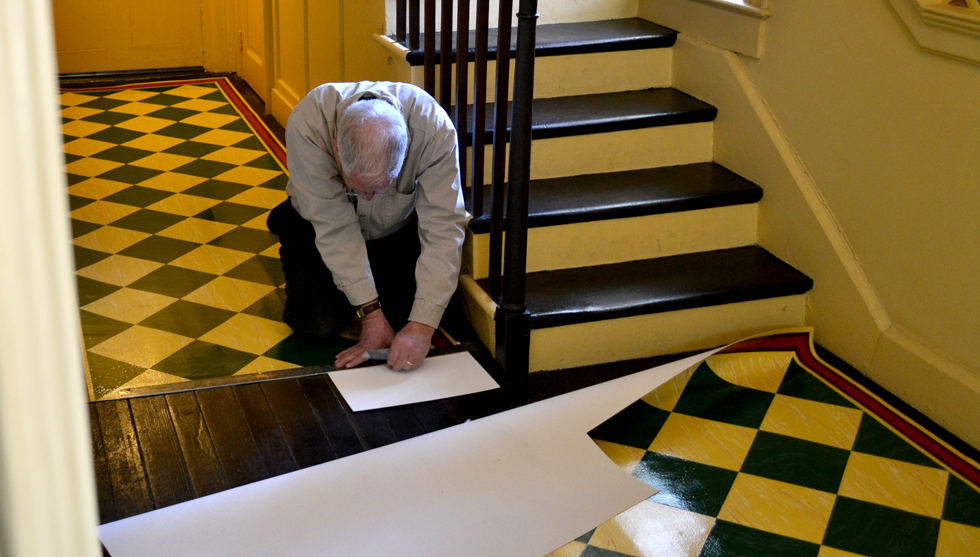
The big question as we drove to the Eastern Shore was whether the floorcloth would fit. The tolerances were quit small. A little mis-measuring along its 29-foot length could create a big problem. Yet there was a surprise even before we started to unroll the two pieces. The corner to the right (as you enter) the front door was not a right angle. It was canted (two 45-degree angles). A tall-case clock stood there when we measured. I just assumed the corner behind it was square. I would have to slice off a corner of the floorcloth. The client, who never mentioned the canted corner before, was unfazed by this decision.

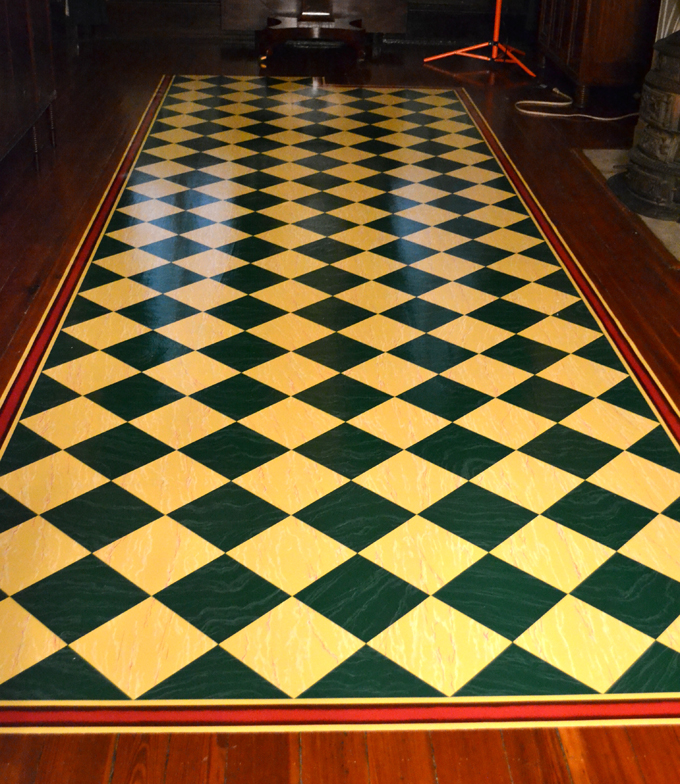
So it was time to roll out both pieces. Drum roll please. But the suspense was unnecessary. It fit as drawn. Notice in the photo the corner sticking up to the left of the door and the little wall at a 45-degree angle. And notice to the right of the bottom of the stairs the line across where to two pieces of floorcloth meet. Actually at this point the narrow piece is 6-inches longer than needed. The extra length is under the end of larger piece. I made it this way so, if necessary, I could trim the narrow piece at a very slight angle so it could properly fit the far end of the hall. It turned out that the precaution wasn’t needed. But it meant that I had to cut the narrow piece in situ. I also had to cut out pieces in two places to accommodate floor registers.
I’m finishing the cutting of the narrow piece.
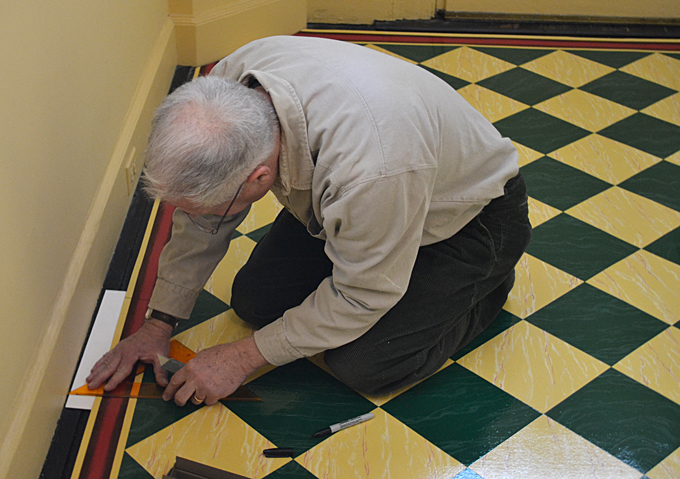
Here I’m making cuts for a floor register.
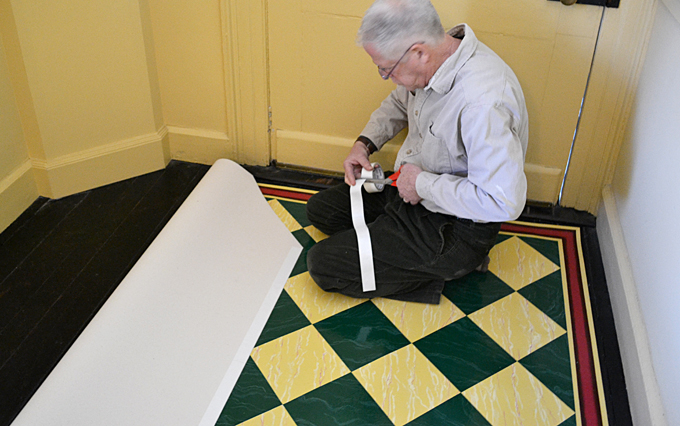
I’m cutting double-sided carpet tape for the underside edges of the floorcloth.
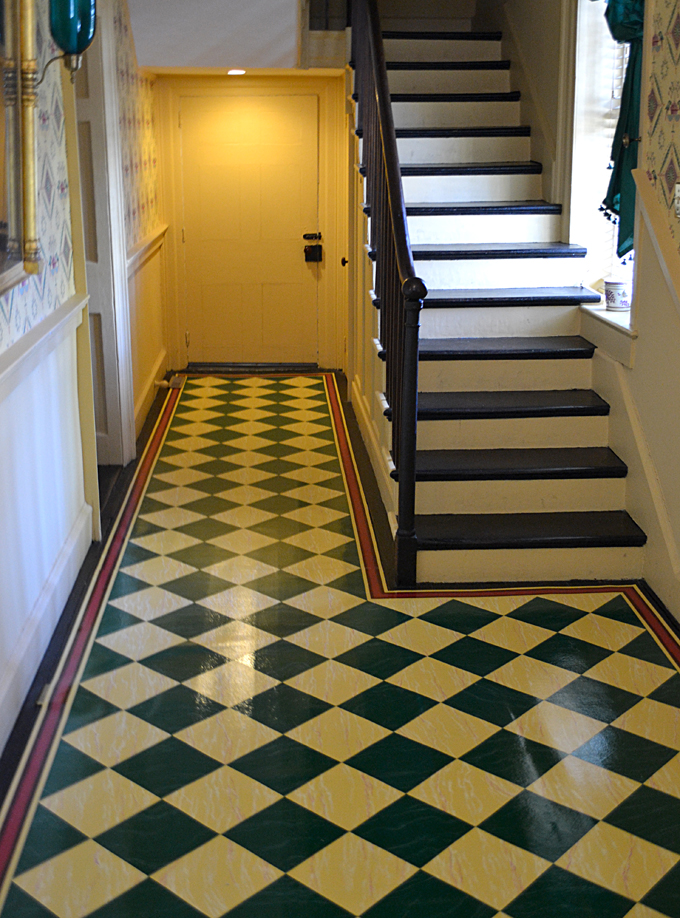
The rear of the floorcloth installed.
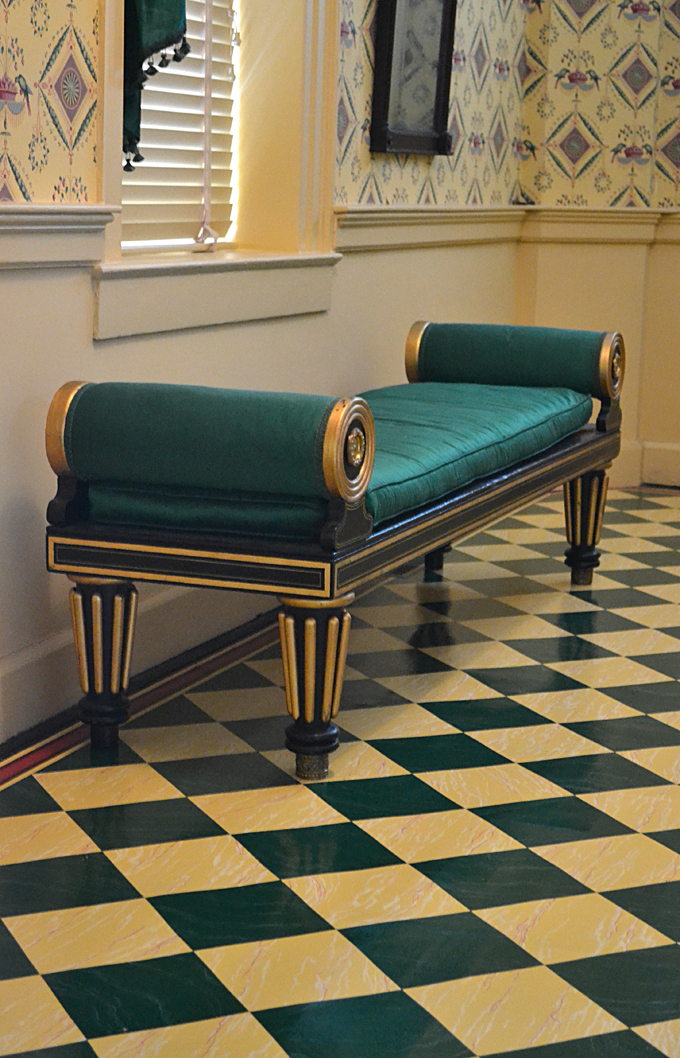
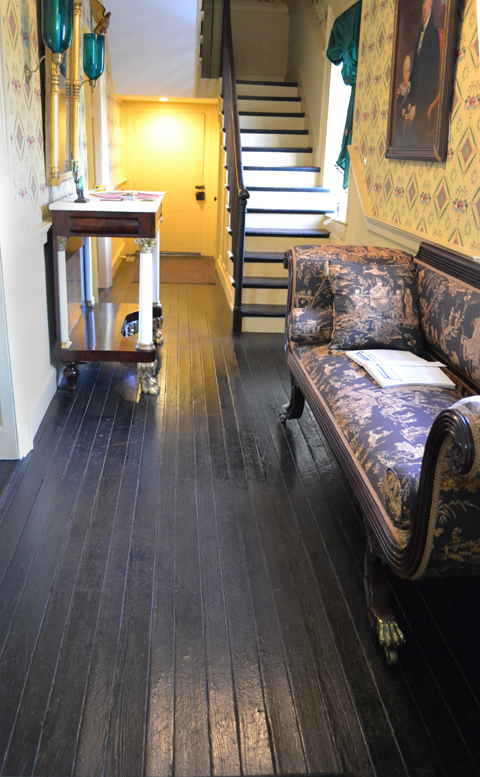
The front of the hall with the client’s Baltimore painted bench.
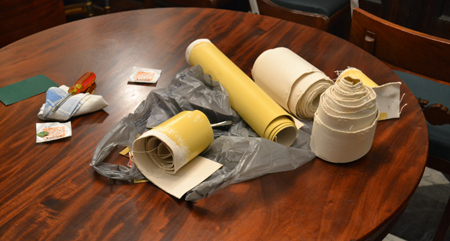
Scraps of canvas from when the floorcloth was originally trimmed before delivery.
Trackback URL: https://www.scottponemone.com/floorcloth-painted-canvas-for-1806-hallway/trackback/
6 comments on “FLOORCLOTH: Painted canvas for 1806 hallway”
Leave a Reply
-
Accessions: Short Stories Dec 21, 2025

-
The Mike and Scott Show: No Reruns Nov 25, 2025

-
Griffin Chairs: Both naive and refined Oct 04, 2025

-
Circularity: The Pairing of Two Talents Jul 12, 2025

-
Frans Masereel: Workers’ Paradise in 1939 Europe Apr 11, 2025

-
Erich Glas: Through the Night vs. Leilot/Nights Jan 15, 2025

-
Gustav Wolf: His Monster Menagerie Dec 23, 2024

-
Linos: #5 through 15 Nov 01, 2024

-
Gustav Wolf: Confessio Aug 02, 2024

-
Justin Remo’s Big Finale May 21, 2024

-
Accessions: Short Stories Dec 21, 2025
-
The Mike and Scott Show: No Reruns Nov 25, 2025
-
Griffin Chairs: Both naive and refined Oct 04, 2025
-
Circularity: The Pairing of Two Talents Jul 12, 2025
-
Frans Masereel: Workers’ Paradise in 1939 Europe Apr 11, 2025
-
Erich Glas: Through the Night vs. Leilot/Nights Jan 15, 2025
-
Gustav Wolf: His Monster Menagerie Dec 23, 2024
-
Linos: #5 through 15 Nov 01, 2024
-
Gustav Wolf: Confessio Aug 02, 2024
-
Justin Remo’s Big Finale May 21, 2024
Thanks for this fascinating e-mail. The finished product is magnificent. Congratulations on your wedding. We just returned from Costa Rica; 9 degrees north
of the equator and glorious weather. The country is a democracy and had disbanded its military. The military funds are used for education and the
population is 99.6% literate. The people are very friendly. Consider Costa Rica as an option for your honeymoon.
Scott–this is fantastic. I loved reading about your process creating the floorcloth. You have that great combination of artistic talent and great precision. And it looks splendid in the hallway.
Wow, Scott, that is beautiful! You are so wonderfully creative–not to mention patient. Congratulations to you and Michael on your marriage. I agree that Costa Rica is a great place for a honeymoon.
Scott, this is stunning. And that surprise corner worked well — it looks as if the floorcloth goes under the wall. I loved all the pics of the process. Hi to Michael…I see you have put him to work.
your work is impeccable!!!! I have found my new calling, I do believe! I am sitting here calling flooring companies for estimates on redoing the floor in my single wide here in FL…then I find your blog!!!!! Oh my, set me loose on a floor cloth! I could never imitate the quality you present here, but then this ain’t the Regency either!!! Lol!! thank you so much for the inspiration!!!
Good luck, Susan. Please share images of your progress.
Scott