What my house taught me
My house made me do it.
When my partner and I purchased a never-divided-up mid-19th-century townhouse in the Mount Vernon neighborhood of Baltimore in 1993, I never suspected I had begun an education in faux finishing.
When we first inspected the house in 1993, we realized that the sellers had no concept that painting a less expensive wood to resemble a more socially prized wood was commonplace when a house was built in the 19th century. In the case of our house, built in the Italianate fashion, the prized finish was black walnut. The use of real black walnut was reserved for the newel post, spindles and handrail of the main staircase, the handrail and newel posts of the service stairs, and doorway thresholds throughout the house. Except for the floor, every other wood surface on the principal (parlor) floor was grain painted to resemble black walnut. This included all the doors–all 5 solid wood doors, two pairs of dramatic 10-foot-high pocket doors with etched glass inserts and a pair of vestibule doors with etched-glass inserts–and all the baseboards and all the door and window moldings. Also the side of the main staircase (below the treads) as it arose to the second and then to the third floor was faux painted.
![]()
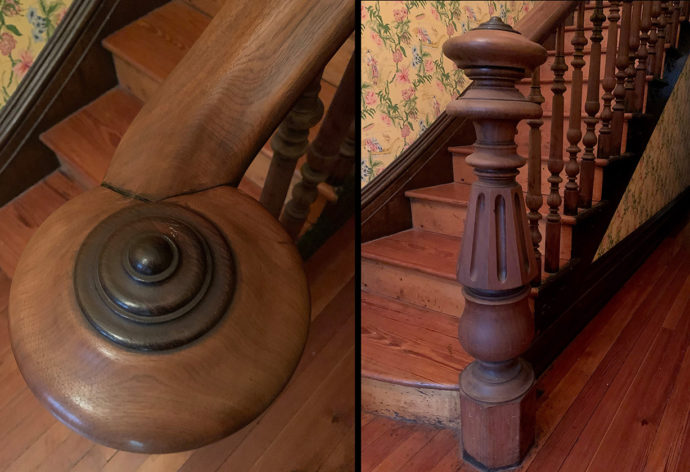
Main stairway–newel post, railing and spindles is composed of black walnut. The newel post button is mahogany. (These elements were refinished, with loss of patina in the 1980s.)
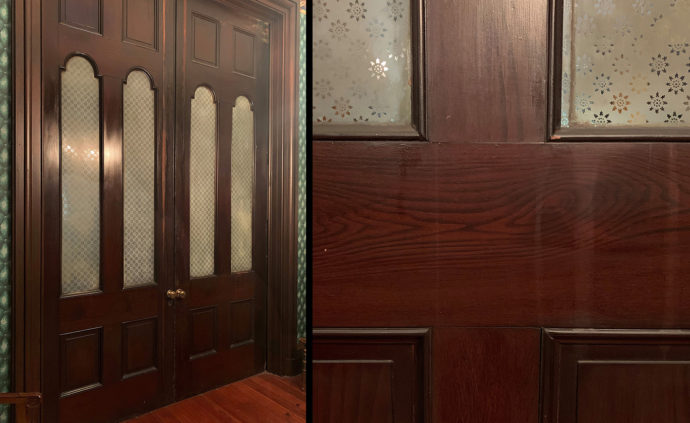
The house has two sets of pocket doors that separate the three parlors on the principal floor. The wood is grained to resemble black walnut. The etched-glass inserts are original. (Note the vertical solvent lines on both doors close to where they meet.)
![]()
But when we bought the house, all of the solid wood doors on the parlor floor had been stripped and stained black walnut. All the baseboards and door and window moldings had been partially stripped leaving an irregular gloppy surface. The best surviving original surface was on the stairway sides. Only a small area on the second floor had been stripped. The pocket doors also had a small area where the original finish had been removed. (I think of it as gold mining, where the workmen kept excavating the original surface hoping to find the mother lode underneath, not realizing that the mother lode was the surface they starting working on.) Unfortunately, when the workmen were mucking up the original finish on the molding surrounding the pocket doors, they had opened the open doors all the way to the doorknobs but didn’t protect the finish on the doors. The result was that each side of the pocket doors has a vertical trail of dissolved finish near the doorknobs.
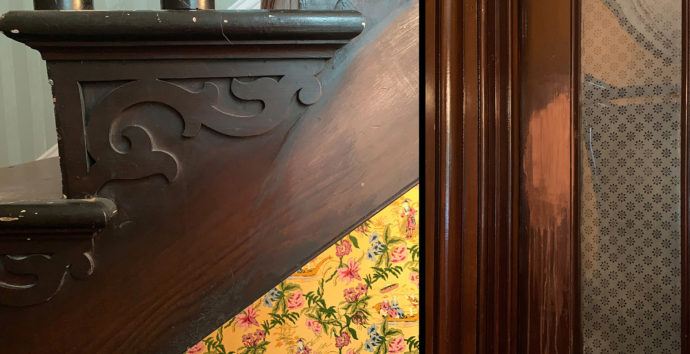
On the side of the main staircase (left) and on one of the pocket doors are patches where the original faux finish was removed. Fortunately when it was realized that those surfaces had been painted to look like black walnut, the destruction of those original surfaces stopped.
No way was I capable of restoring the faux finish of the pocket doors. I did somewhat darken the areas where raw wood was showing. Someday someone who loves the house as much as we do but with deeper pockets than ours will hire professionals to correct the damage seamlessly. The surviving original finish on those doors, however, was an inspiration. It offered an excellent example of how to paint wood to look like black walnut.
But where to apply that inspiration. For me the obvious choice were the stripped and stained solid wood doors on the first floor. The grain of the pine visible through the walnut stain just seemed inappropriate for the parlors. But it would take some five years before I’d tackle the task. The first years in the house were devoted to painting or wallpapering the rooms on the second and third floor. I did purchase the book Professional Painted Finishes: A Guide to the Art and Business of Decorative Painting (Ina Brosseau Marx, Allen Marx & Robert Marx, Whitney Library of Design, Watson-Guptill Publications, New York, 1991).
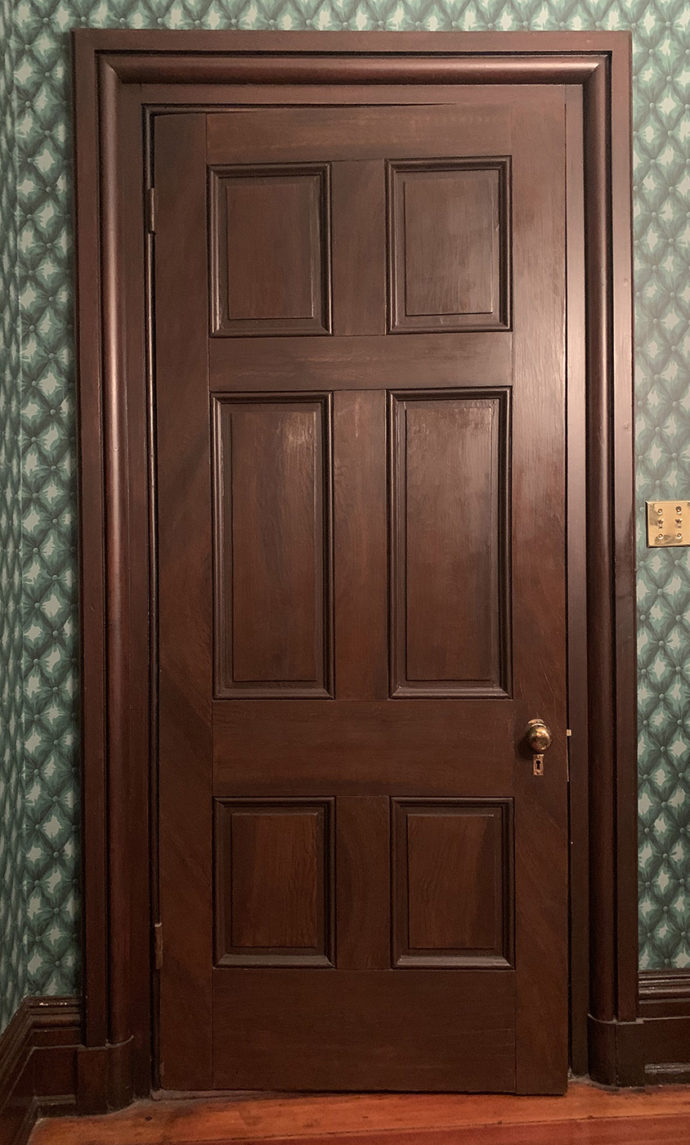
Middle parlor door after faux graining. (Below) Detail of one of the door’s bottom panels.

Originally the wood graining in my house was done with oil (alkyd) paints (or as the book referred to paint-thinner-soluble media). Certainly the book has instructions and recipes for working with oil paints, and use of such slow drying media would provide time to simulate wood grain. But I didn’t really want to stink up the house for weeks, and my decades of fine arts painting in watercolors inclined me to prefer a quick drying media. So instinctively I gravitated to the section on “Country Graining,” where instructions on how to paint blanket chests were provided. The deciding factor was a minor part of my legacy from my father: a quart bottle of powdered gum arabic. That along with powdered pigments and apple cider vinegar was the ingredient for country painting.
In the fall of 1998 I began by prepping a thin piece of plywood with a latex primer followed by a coat of a tannish pink (a color suggested by Professional Painted Finishes). This would be a test surface. Using the country graining formula in the book, I mixed my first batches of paint. First dissolving a tablespoon of gum arabic in distilled water, adding vinegar and a combination of Gamblin-brand dry pigments: raw umber, raw sienna, Indian red and/or ivory black. Once satisfied with a particular mixture, I took a two-inch brush with three-inch bristles and applied paint by repeatedly hitting the side of the brush against the plywood in order to create a mottled striated pattern. Then I played with mixing paints for the lines of walnut grain. But when I applied that onto the plywood, I quickly realized that the initial striated pattern started to dissolve as soon as I tried to paint the line of grain on top of it. The solution was to isolate each layer of paint with a layer of shellac that then needed to be roughed up with 4-0 steel wool in order to provide the tooth needed for the next layer of paint. (And bits of steel wool debris needed to be removed with a tack cloth before the next coat of water-base paint was applied.)
Only then did I tackle the doors on the first floor (excluding the pocket doors). Even then I used the door separating the front hall from the service stairs as a practice place. (Good idea, since the graining on it turned out to be coarser that what I accomplished on the other doors.) I needed four weeks of mornings (my gainful work day at the Baltimore Sun began at 4 p.m.) to apply four layers of paint between layers of shellac and a final paste waxing to complete the task. (The outside facing side of the vestibule door had to be redone in acrylic paint since the shellac layers fogged up because of the cold in the unheated vestibule.)
That was arduous work, not to be repeated even though I was pleased with the results. So when I turned to messed-up baseboards and door and window surrounds, I chose acrylic paint. A test plywood showed that I could use a clear medium and tube paints to create a semi-transparent mixture to be applied with a slapping motion with the side of the long-bristle brush to create irregular striations. One layer was all that was needed to beautify baseboards and moldings.
That lesson inspired me to try my hand on the front door with acrylic and latex paints but not until 2000. After some wood puttying, sanding, and an exterior alkyd primer, essentially it was the same sequence as the inside doors minus the layers of shellac. The raised moldings were painted first and painted darker than the flat areas. A coat of spar urethane varnish completed the job.
Summer expansion and winter contraction of the joints in the doors required attention some years with wood putty and in-painting. But when the varnish started alligatoring after the winter of 2019-20, there was no solution but the wholesale sanding of the doors and a complete regraining. The second time around I approached the painting of the lines of grain differently. Instead of thinking about creating lines of grain, I thought of darkening/obscuring the two base coats (the solid pinkish layer and the slapped-on striations). This way I didn’t make the lines of grain too dark and too mechanical looking. I just applied enough paint to sell the idea of graining and let the glow of the undercoats come through.
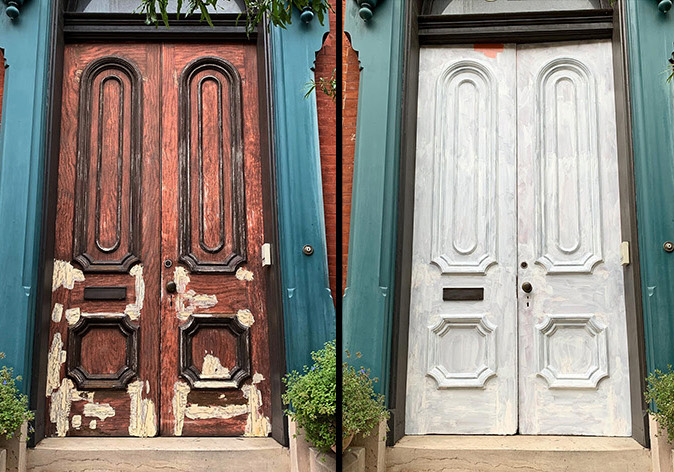
(L to R): Wood filler applied after sanding older graining and varnish on front doors; primer coat.
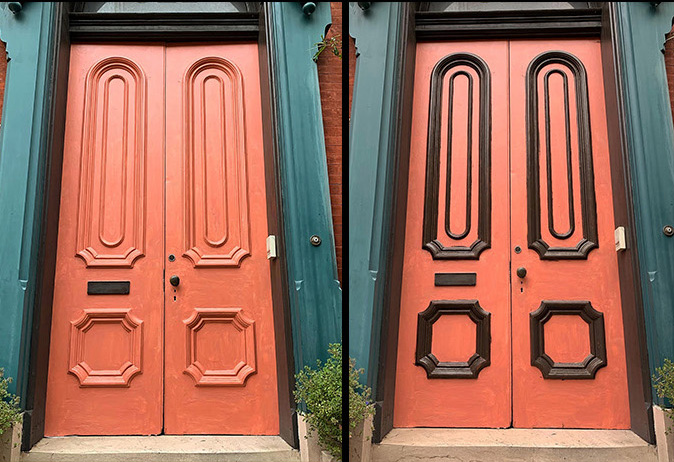
(L to R): Two coats of base color; moldings painted a dark brown leaving streaks of base coat showing to give a sense of wood grain.
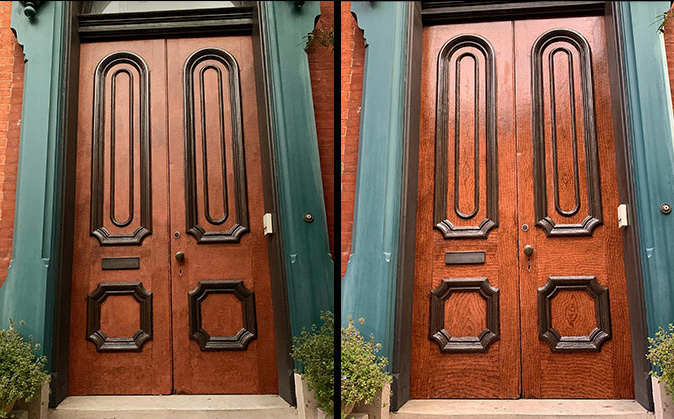
(L to R): To create overall wood texture, a thin coat of rather translucent brown paint applied with the side of long-bristle brush; wood grain lines applied with same translucent paint.
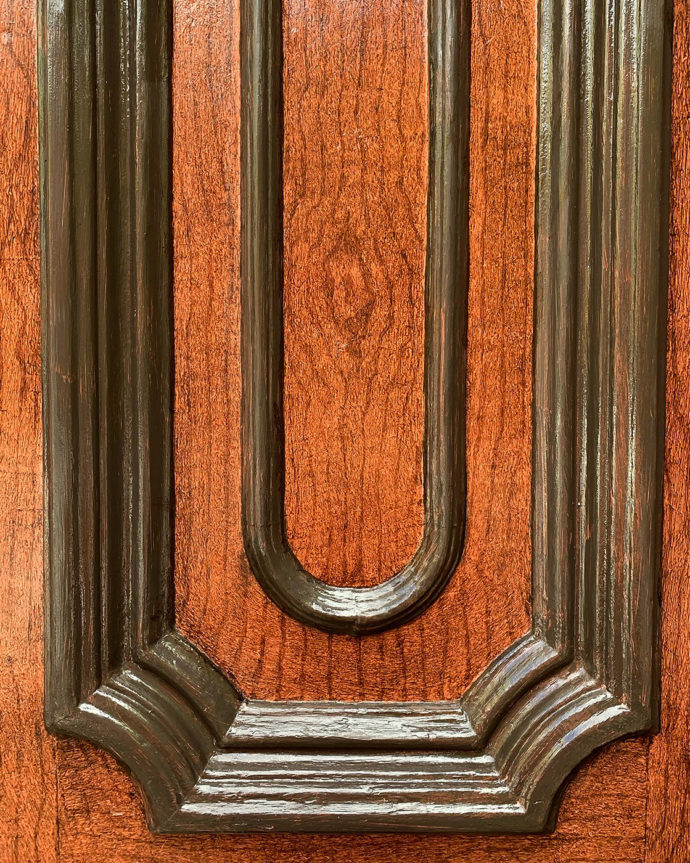
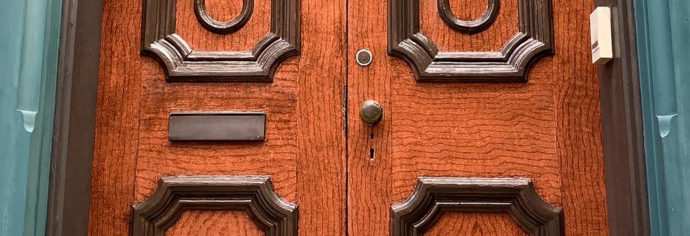
Close-up of one of the exterior front doors
By the way, one winter in the 1990s I again turned to the Professional Painted Finishes book on how to fake sandstone blocks for the vestibule walls. Most of the work was in ruling off the blocks and then using tape the reserve the thin spaces between the blocks. The subtle graining of the blocks required umpteen pats with wads of cheesecloth, moving slowly but deliberately back and forth.
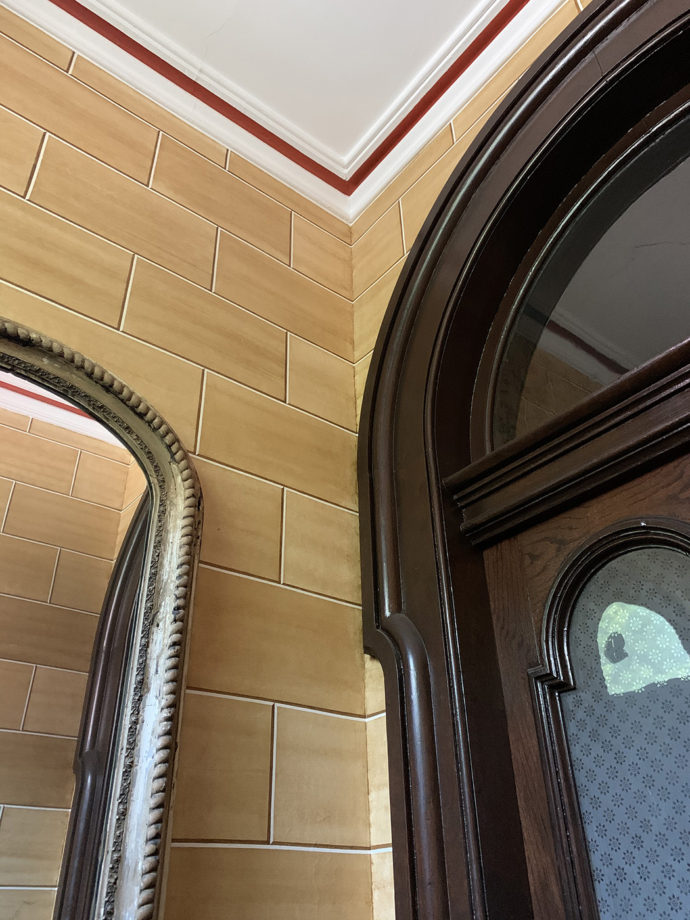
Faux sandstone blocks were painted on the vestibule walls. Note the graining on the door. Its etched glass insert matches those on the pocket doors.
Even if I had known when we agreed to buy our Mount Vernon townhouse in 1993 that I would spend weeks and weeks learning to faux paint, I wouldn’t have been deterred. After all when you choose to share your life in an old house, your life will change for the better and the house will be thankful for it. It’s a partnership after all.
Seven years ago I blogged that our house insisted that I learn to create floor cloths, which involved painting canvas to look like marble. That post focused on a major commission I did for an early 19th-century house on Maryland’s Eastern Shore. Here is the LINK to that post.
Trackback URL: https://www.scottponemone.com/what-my-house-taught-me/trackback/
Leave a Reply
-
Accessions: Short Stories Dec 21, 2025

-
The Mike and Scott Show: No Reruns Nov 25, 2025

-
Griffin Chairs: Both naive and refined Oct 04, 2025

-
Circularity: The Pairing of Two Talents Jul 12, 2025

-
Frans Masereel: Workers’ Paradise in 1939 Europe Apr 11, 2025

-
Erich Glas: Through the Night vs. Leilot/Nights Jan 15, 2025

-
Gustav Wolf: His Monster Menagerie Dec 23, 2024

-
Linos: #5 through 15 Nov 01, 2024

-
Gustav Wolf: Confessio Aug 02, 2024

-
Justin Remo’s Big Finale May 21, 2024

-
Accessions: Short Stories Dec 21, 2025
-
The Mike and Scott Show: No Reruns Nov 25, 2025
-
Griffin Chairs: Both naive and refined Oct 04, 2025
-
Circularity: The Pairing of Two Talents Jul 12, 2025
-
Frans Masereel: Workers’ Paradise in 1939 Europe Apr 11, 2025
-
Erich Glas: Through the Night vs. Leilot/Nights Jan 15, 2025
-
Gustav Wolf: His Monster Menagerie Dec 23, 2024
-
Linos: #5 through 15 Nov 01, 2024
-
Gustav Wolf: Confessio Aug 02, 2024
-
Justin Remo’s Big Finale May 21, 2024